Project Overview & Direct Cost Answer
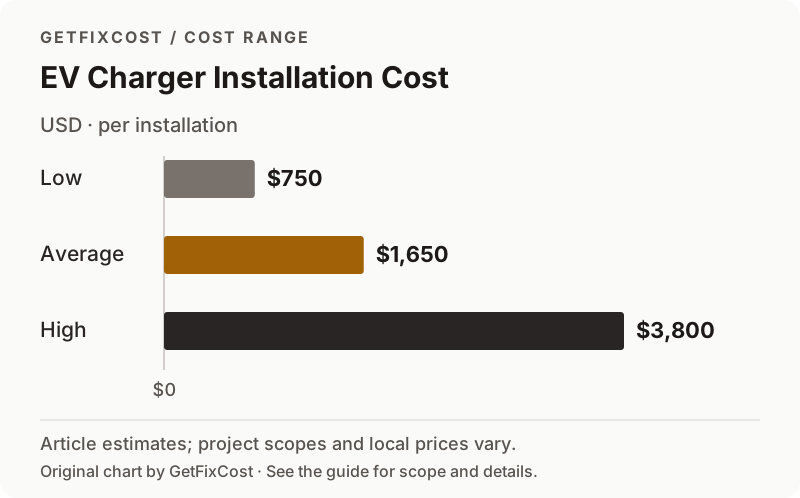
Installing a dedicated Level 2 electric vehicle (EV) charging station at home typically costs between $750 and $3,800, with the national average centering at $1,650 for a complete turnkey installation in an attached garage.
The overall investment breaks down into two distinct expenses: $400 to $700 for the Level 2 Electric Vehicle Supply Equipment (EVSE) charging hardware (such as a Tesla Universal Wall Connector, ChargePoint Home Flex, or Grizzl-E), and $400 to $1,500 for professional master electrician labor, dedicated 240V copper wiring, conduit, and municipal electrical permits.
If your electrical panel has ample open ampacity and sits within 10 to 15 feet of your garage parking bay, installation can cost as little as $750 to $1,100. Conversely, if your breaker panel is located on the opposite side of the house in a finished basement, or if your service requires upgrading from 100 amps to 200 amps, total project costs range from $2,500 to $4,500+ before utility rebates.
Quick-Reference Cost Table
| Installation Scenario | Typical Hardware Cost | Electrician Labor & Conduit | Total Cost Range | Typical Charging Speed |
|---|---|---|---|---|
| Short Run (Under 15 Ft, Panel in Garage) | $400 – $650 | $350 – $750 | $750 – $1,400 | 25 – 45 Miles / Hour |
| Medium Run (25–50 Ft Across Basement) | $450 – $700 | $750 – $1,400 | $1,200 – $2,100 | 25 – 45 Miles / Hour |
| Long Run / Detached Garage (Trenching) | $500 – $750 | $1,800 – $3,500 | $2,300 – $4,250 | 25 – 45 Miles / Hour |
| Install Requiring 200A Panel Upgrade | $450 – $700 | $2,200 – $3,800 | $2,650 – $4,500 | 35 – 50 Miles / Hour |
| NEMA 14-50 240V Outlet Only | $50 – $120 (Outlet) | $400 – $950 | $450 – $1,070 | 25 – 32 Miles / Hour |
Cost Factors That Impact Total Pricing
Several crucial electrical and architectural elements determine your EV charger installation costs:
- Distance from Electrical Panel to Parking Bay: Heavy 6 AWG or 4 AWG copper wire costs $3.50 to $6.00 per foot. Running conduit 10 feet inside an open garage costs under $150 in materials; drilling through multiple finished basement floor joists or running 75 feet across an attic costs $600 to $1,200 in conduit and labor.
- Hardwired vs. 240V Plug-In (NEMA 14-50): Modern electrical codes require expensive GFCI breakers ($100–$150) on 240V garage outlets, which frequently nuisance-trip when paired with EV chargers that feature built-in self-testing GFCI circuits. Hardwiring eliminates the outlet, bypasses the nuisance tripping, and allows charging at 48A (11.5 kW) vs 40A max on a plug.
- Electrical Panel Spare Ampacity: A Level 2 charger draws 32 to 48 amps continuously. Per the National Electrical Code (NEC), continuous loads require a breaker rated at 125% of the draw (40A to 60A breaker). If your panel has zero open capacity, you will need a subpanel ($600 to $1,200) or a full 200A service upgrade ($1,800 to $3,500).
- Detached Garage Underground Trenching: Running electrical service to a detached garage requires hand-digging or trenching a 18-inch to 24-inch deep trench through lawns, pavers, or driveways, adding $1,000 to $2,500.
- Smart Dynamic Load Shedding: Homeowners with 100A panels who want to avoid an expensive panel upgrade can install a smart energy management monitor (like Emporia Vue or DCC-9) that pauses car charging if the stove and AC run simultaneously, costing $500 to $1,000.
Regional Cost Variations Across the US
Electrician labor rates and municipal permit fees create noticeable price variations:
- West Coast (CA, WA, OR): High electrician hourly wages ($100–$160/hr) and strict municipal permit inspections average $1,400 to $2,600 for standard installations.
- Northeast (NY, MA, PA): Older housing stock, detached garages, and complex basement layouts result in typical costs between $1,300 and $2,400.
- Midwest (IL, OH, MI): Readily accessible basement utility rooms and competitive contractor markets average $900 to $1,800.
- South & Texas (TX, FL, GA): Lower labor rates keep standard garage installations around $800 to $1,600, though detached garage trenching remains a variable.
Repair vs. Replace: How to Decide
Determine the best charging strategy for your daily driving habits:
- When Level 1 Charging is Sufficient: If you drive fewer than 30 to 40 miles daily and have 12 to 14 hours overnight, plugging into an existing standard 120V household wall outlet recovers 3 to 5 miles of range per hour at $0 upfront cost.
- When Level 2 is Essential: If you commute 50+ miles daily, own two electric vehicles, experience cold winter range degradation, or need the flexibility to fully recharge in 4 to 6 hours between trips, Level 2 installation is a necessity.
- Repairing an Existing EVSE: If your existing wall charger fails, check the manufacturer warranty (most carry 3-year replacement warranties). Replacing a wall unit on existing wiring takes under an hour ($150 to $250 labor).
DIY vs. Hiring a Professional & Safety Warnings
While mounting the EV charger plastic bracket to a garage wall stud is simple, wiring a dedicated 240V high-amp circuit requires a licensed master electrician.
An EV charger represents one of the largest continuous electrical loads in a modern home, pulling 32 to 48 amps non-stop for 6 to 10 hours overnight. Under-torqued terminal lugs, improperly sized wire gauges, or cheap builder-grade receptacles can experience thermal runaway, melting plastic enclosures and presenting extreme garage fire hazards.
Licensed electricians calculate total home load using NEC Article 220 calculations, torque electrical terminals to exact manufacturer inch-pound specifications with calibrated torque screwdrivers, pull municipal trade permits, and guarantee safe continuous operation.
Warning Signs You Need Action Immediately
Watch for these critical warnings on your home charging setup:
- Hot or Scorched Outlet Faceplate: A warm 240V outlet or melted plastic around plug prongs indicates severe electrical resistance and imminent fire hazard.
- Frequent Breaker Tripping: Breakers tripping during charging indicate loose terminations, faulty GFCI interaction, or panel overload.
- Burning Plastic Odor During Charging: Evacuate the area, switch off the breaker immediately, and call an electrician.
- Charger Red Error Status Lights: Indicates ground fault failure, missing neutral, or high internal unit temperature.
- Nuisance Charging Interruptions: Repeated charging interruptions point to thermal throttling in the onboard charger or voltage fluctuations on the utility line.
Hidden Costs & Contractor Pitfalls
Review electrician proposals to verify these commonly overlooked expenses:
- Commercial-Grade 14-50 Receptacles: If choosing a plug-in setup, avoid cheap $12 builder-grade outlets (like Leviton 14-50) which melt under continuous 40A EV loads. Insist on a heavy-duty industrial-grade receptacle (like Bryant or Hubbell), adding $50 to $100.
- Electrical Permit & Inspection Fees: Municipal building permits and electrical inspector walk-throughs cost $75 to $250.
- Drywall Notching & Patching: Fishing Romex through finished garage or basement drywall often leaves cutouts; repairing sheetrock is typically excluded.
- Subpanel Addition: If breaker slots are full, installing a small auxiliary subpanel adds $400 to $800.
How to Save Money and Vet Contractors
Maximize your electric vehicle charging investment with these proven tips:
- Check Electric Utility Rebates: Many power utilities offer cash rebates between $250 and $1,000 for installing smart, connected EV chargers, plus discounted off-peak electric charging rates (as low as 5¢ to 8¢ per kWh).
- Federal Section 30C Tax Credit: Check the US Department of Energy census tract mapping tool. If your address qualifies, claim 30% of your total hardware and installation costs up to $1,000.
- Opt for Hardwiring: Hardwiring eliminates the need for an expensive GFCI breaker ($120) and heavy-duty industrial receptacle ($80), saving roughly $200 while delivering faster charging speeds.
- Obtain Three Itemized Bids: Require contractors to specify wire gauge (copper vs aluminum), breaker size, conduit type, and permit inclusion.
Typical Project Timeline & Process
A standard residential Level 2 EV charger installation proceeds through these steps:
- Phase 1: In-Home Assessment & Permitting (1 to 2 Weeks): The electrician inspects your panel, calculates load capacity, and pulls a municipal electrical permit.
- Phase 2: Conduit & Wire Rough-In (2 to 4 Hours): Heavy metallic conduit or Romex cable is routed from the panel to the chosen garage parking location.
- Phase 3: Mounting & Termination (1 to 2 Hours): The wall charger is securely anchored to studs, heavy copper wires are torqued to specifications, and the double-pole 240V breaker is installed.
- Phase 4: Commissioning & City Inspection (1 to 3 Days Later): The station is paired with Wi-Fi, test-charged with your vehicle, and approved by the municipal electrical inspector. zed expertise.
- Do I need a smart Wi-Fi charger? Smart chargers let you schedule charging during off-peak electric hours and track energy consumption, often unlocking utility rebates.
- Will an EV charger work outdoors? Yes; outdoor-rated NEMA 3R or NEMA 4 chargers (like Grizzl-E or ChargePoint) are completely weatherproof against rain, snow, and ice.
Next Steps & Estimate Checklist
Before scheduling electrician consultations:
- Take clear photos of your electrical panel data label, main breaker rating, and open breaker slots.
- Choose your preferred parking location and measure the distance from the breaker panel.
- Request written itemized quotes from three licensed local electricians specifying hardwired vs plug-in options.
Frequently Asked Questions
01. How much does it cost to install a Level 2 EV charger at home?
02. What is the federal tax credit for home EV chargers?
03. Do I need a 200-amp electrical panel to install an EV charger?
04. Is it better to hardwire an EV charger or use a NEMA 14-50 plug?
05. How fast does a Level 2 home charger charge an electric vehicle?
Related Cost Guides
More in this trade →
Electrical Panel Upgrade Cost
Learn what electrical panel upgrades cost, from 100-amp to 400-amp service, including permits and electrician rates.
House Rewiring Cost
Learn what whole-house rewiring costs, including permits, drywall repairs, and electrical panel upgrades.